
Your Ultimate RV Bathroom Renovation Guide
A lot of RV owners start thinking about an rv bathroom renovation right after a trip where the little annoyances finally add up. The shower feels tighter than it should. The vanity wastes space. A cabinet door hits your knee. The old fan can't keep up after one hot shower at a campground near Moab or Bear Lake. What looked acceptable on the lot starts feeling dated, awkward, or just not built for how you travel.
That's where RV renovation gets tricky. A home bathroom remodel and an RV bathroom remodel are not the same job. In a house, you mostly think about style, plumbing access, and budget. In an RV, you also have to think about weight, tank capacity, vibration, moisture, and service access. One bad material choice can create handling problems on Utah canyon grades. One plumbing shortcut can turn into a leak hidden behind a wall panel.
We've seen both ends of it. Some bathroom projects are smart weekend upgrades. Others need a careful plan before a single screw comes out. If you're considering an rv bathroom renovation, the work goes better when you treat it like a systems project first and a decorating project second.
Introduction
An rv bathroom renovation usually starts with a simple complaint. The bathroom feels dark, cramped, worn out, or hard to clean. Then you start pricing fixtures, looking at shower surrounds, and wondering whether you can make the space feel more like home without creating a bigger problem somewhere else.
That's the right instinct. Bathroom upgrades aren't a fringe idea. They sit inside the most common interior remodeling category. In 2025, NAHB remodelers reported bathroom remodeling as the most frequent project, with 73% rating it as common to very common, according to NAHB remodeling market reporting. RV owners aren't doing something unusual when they want a better bathroom. They're following one of the clearest comfort-upgrade patterns in remodeling.
The part most guides miss is that RVs punish bad assumptions fast. A vanity that looks perfect online may be too deep for the door swing. A residential toilet may use more water than your travel style can support. Tile may look sharp in photos and turn into loose grout after miles of washboard roads in southern Utah.
Practical rule: Build your RV bathroom around movement, moisture, and maintenance. Looks come after that.
Planning Your Project Budget, Timeline, and Goals
Start with the kind of camping you typically do.
An RV bathroom that only needs to survive a few summer weekends at Bear Lake can be planned differently than one used for long boondocking trips in southern Utah or regular winter travel through Logan Canyon. Budget, materials, and fixture choices all change once you factor in tank capacity, road vibration, and how long the coach can sit in the shop or driveway.
I usually sort these projects into three levels.
Cosmetic refresh
This is the right choice when the bathroom is ugly, dated, or hard to clean, but the plumbing works and the floor is solid. You keep the layout and improve what you see every day.
Typical work includes:
- Surface updates: paint, wall covering, cabinet pulls, mirror, faucet, or light fixture
- Moisture cleanup: fresh caulk, new sealant, trim repair, mildew-resistant finishes
- Small comfort upgrades: better shower head, towel storage, hooks, shelving
This route keeps cost and downtime down. It also avoids opening walls that may turn a weekend project into a repair job.
Functional upgrade
This is the sweet spot for a lot of RV owners. The bathroom footprint stays close to the same, but the room works better.
That usually means:
- Fixture swaps: RV toilet replacement, compact sink, lighter vanity, new vent fan
- Water-conscious changes: low-flow fixtures, easy-clean shower surround, wall panels that do not soak up moisture
- Storage fixes: recessed organizers, medicine cabinet replacement, shelf changes that do not interfere with travel
A functional upgrade gives you a noticeable improvement without the cost and risk of rebuilding everything. It also gives you more control over weight, which matters in a way home remodel guides rarely mention.
Full tear-out and rebuild
Owners need to be honest about scope.
Once the old shower pan, wall panels, or vanity come out, hidden problems show up fast. Soft subfloor near the toilet. Loose fasteners from years of road movement. Old plumbing fittings that were not leaking yet, but are one wrench turn away from it. At our service department in Utah, this is the stage where a simple bathroom update sometimes turns into water damage repair and plumbing rework.
Tiles Mate bathroom planning advice is useful for organizing scope before demolition. In an RV, the stricter rule is to decide early what must stay serviceable after the remodel. Shutoffs, pump access, drain connections, and tank-related components cannot get buried behind pretty finishes.
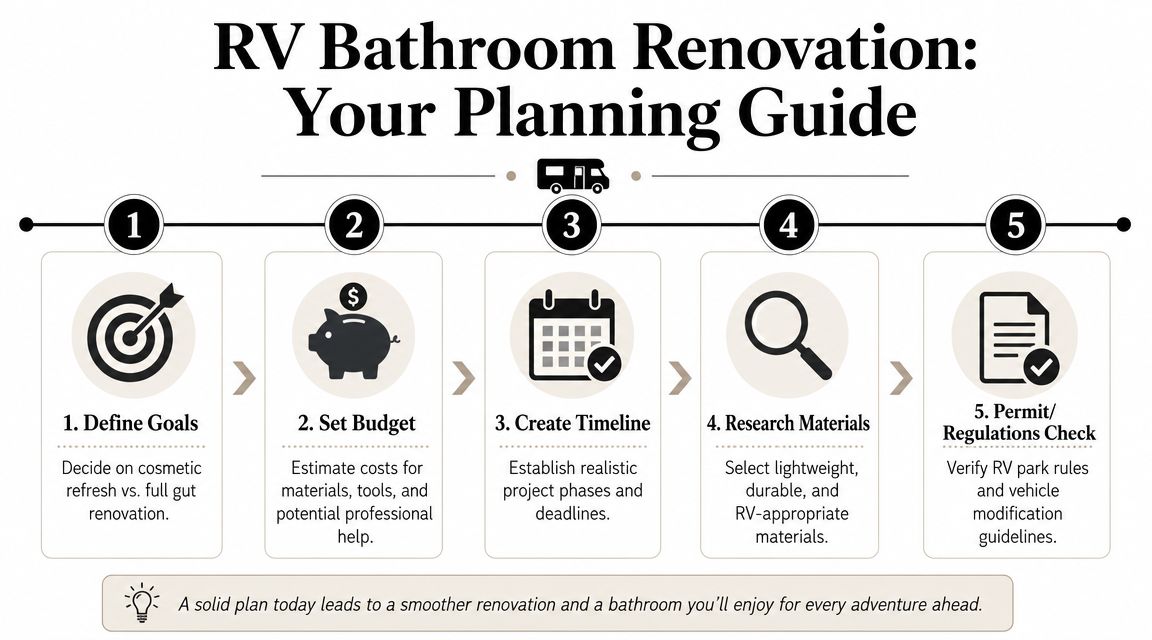
Budget for the work you can see, and the repairs you cannot
The visible parts fool people. Faucets, panels, hardware, and a new toilet are easy to price. Rotten subfloor, a cracked drain fitting, or a vent fan circuit problem is not.
A contingency fund belongs in the plan from day one. Consumer renovation guidance from NerdWallet's bathroom remodel cost overview recommends setting aside extra money for surprises, and that advice applies even more in RVs because so much is packed into a small cavity. If the rig has any history of leaks around the toilet, shower, roof vent, or exterior wall, leave more room in the budget.
House-bathroom averages do not transfer cleanly to RVs, but the pattern is the same. Bathroom work gets expensive once plumbing, moisture repair, and finish replacement stack together. In an RV, one bad choice can also cost payload, reduce fresh water efficiency, or create a fixture that starts loosening after a few thousand miles.
Set goals that match how the RV gets used
“Make it nicer” is too vague. A better goal is one of these:
- Make it easier to clean
- Use less water
- Improve storage
- Fix worn or leaking components
- Freshen it up for resale
- Get a more residential look without adding too much weight
Those goals lead to different decisions. If boondocking matters, water-saving fixtures and a practical toilet upgrade deserve more budget than decorative finishes. If resale matters, neutral materials and clean installation quality usually pay off better than trendy choices.
Build the timeline around parts and travel
The actual deadline is not demo day. It is the next trip where the RV has to be usable.
Do not tear into the bathroom the week before a Moab run or a family reservation at Jordanelle unless every part is already on site and test-fit. RV-specific toilets, compact vanities, shower surrounds, and odd-size fans are often slower to replace than homeowners expect. Utah weather adds another layer. Cold-season sealants, cure times, and outdoor storage conditions can stretch a project longer than the calendar says.
A workable sequence looks like this:
- Set the goal and scope
- Confirm parts availability before demolition
- Buy finish materials and replacement plumbing parts early
- Block out extra downtime for hidden repairs
- Test everything before travel, including leaks, fan operation, latch clearance, and fixture movement after a short road run
DIY can save money on a cosmetic refresh. It gets riskier once plumbing, electrical, or subfloor repair enters the job. That is usually where professional service earns its keep. We see fewer repeat repairs when the bathroom is planned around access, weight, tank use, and road movement from the start.
Measure Twice, Cut Once Weight and Space in Your RV
A bathroom can look roomy on a parts website and still fail in a real RV by half an inch. We see it all the time at Motor Sportsland. The replacement vanity fits the wall width, but the drawer hits the toilet. The new shower surround clears the pan, but it will not make it through the entry door. In an rv bathroom renovation, small misses turn into expensive reorders fast.
Measure the room like a technician, not a homeowner
Start with the RV parked level. Measure at the floor, mid-wall, and near the ceiling, because many RV bathrooms are not square and the walls often taper. Then measure every moving part. Door swing, toilet lid clearance, knee space at the vanity, shower door travel, and the path each new part has to take to get inside all matter.
A dry fit on paper is not enough.
Use cardboard or painter's tape to mock up the footprint of the toilet, vanity, and shower pan. Remodeling pros regularly warn that poor measurement and skipped fit checks create avoidable install problems, as outlined in this remodel planning checklist. In an RV, those problems get tighter because you are also working around furnace ducts, wheel wells, shallow wall cavities, and access panels.
Check these before you order:
- Entry and bathroom door clearance: can the fixture get in, and can the door still open fully after install?
- Roofline and ceiling height: curved caps and vent housings can reduce usable space
- Wall and floor depth: screw length, backing, and anchor choice matter more in thin RV construction
- Toilet and vanity spacing: make sure knees, elbows, and lids clear in normal use
- Service access: keep a path to PEX fittings, traps, pump lines, shutoffs, and mounting hardware
Weight changes how you choose everything
Weight is part of the layout, not a separate math problem at the end. A heavier vanity, thicker wall finish, or residential toilet can push a small bathroom upgrade past what makes sense for the coach. That matters even more in towables, where cargo balance and axle loading affect how the trailer behaves on the road.
Home remodeling advice often skips that part. RV owners need to account for cargo carrying capacity, tank loads, and axle ratings, and the National Highway Traffic Safety Administration explains why loading and weight distribution directly affect handling and stopping in its tire, loading, and towing guidance. In plain terms, too much added weight in one corner can show up later as poor towing manners, premature wear, or loose fixtures after a rough stretch of I-15.
Utah roads make this real. Expansion joints, canyon grades, and long summer trips expose weak installs quickly.
Material trade-offs that matter in an RV bathroom
Flacks Flooring renovation budgeting tips are useful for sorting cost and scope, but RV bathroom choices also need to hold up under vibration, moisture, and limited carrying capacity.
Here is the comparison we walk customers through:
| Choice | Weight impact | Durability on the road | Moisture performance | Technician view |
|---|---|---|---|---|
| Sheet vinyl | Light | Good | Good | A practical choice for many trailers and motorhomes |
| Vinyl plank | Moderate | Good if installed carefully | Good | Better appearance, but edge prep and transitions decide how long it lasts |
| Tile | Heavy | Often poor under vibration | Good when intact | Usually a poor trade-off in a towable RV |
| Solid wood vanity | Heavy | Fair | Depends on finish | Can add weight fast in a very small room |
| Lightweight composite vanity | Lighter | Good | Good | Usually the safer pick for RV use |
| Waterproof wall panels | Light to moderate | Good | Very good | Easier to seal and maintain than grout systems |
| Painted wallboard | Light | Fair | Fair | Works only in low-splash areas with good ventilation |
Residential products are not automatically wrong. They just need to earn their place. If a fixture adds weight, uses more water, or needs fastening points the RV does not have, the better-looking option often becomes the worse repair decision.
Choosing RV-Ready Materials and Fixtures
A customer picks out a sharp residential vanity, a heavier sink, and tile that would look great in a house. Then we weigh the parts, check the floor support, and look at the black and gray tank setup. That is usually the moment the bathroom plan shifts from style-first to RV-ready.
Materials in an rv bathroom renovation have to handle road vibration, humidity swings, winterizing chemicals, and tight service access. Good choices stay light, seal well, and keep working after a few thousand miles on Utah roads.
Start with surfaces that can move a little
Floors and walls take more abuse in an RV than many homeowners expect. The problem is not just water. Road vibration and temperature swings work on every seam, edge, and fastener.
For flooring, the safer picks are usually sheet vinyl and vinyl plank. Sheet vinyl stays lighter, gives water fewer paths to reach the subfloor, and works well in small bathrooms with awkward cuts around the toilet flange and tub pan. Vinyl plank gives a more residential look and allows spot repairs, but it only lasts if the floor is flat, the perimeter gaps are right, and the transitions are secured for travel.
Wall finishes follow the same logic. Waterproof wall panels hold up better in shower areas and around sinks because they have fewer joints to maintain. Painted wallboard still has a place in dry sections, but around splash zones it tends to show failure faster through swelling, peeling, or soft spots.
Fixture choices affect more than appearance
A fixture has to fit the plumbing, the tank system, and the available carrying capacity. That is the part generic home remodel advice misses.
A taller faucet can splash more in a shallow RV sink. A deep bowl sink can crowd the drain and trap in a cabinet that already has almost no extra room. A residential toilet may physically fit the footprint, but it can use more water per flush and put more strain on a floor that was built for lighter RV components. The RV Lifestyle guide to RV toilets is a useful reference for comparing toilet types and how they interact with tank capacity and water use.
Here are the trade-offs we discuss at the service counter:
- RV toilets: usually the safer match for black tank connection, water use, and compact spacing
- Residential toilets: often heavier, bulkier, and harder to service in tight bathrooms
- Compact vanities: preserve knee room, door swing, and access to shutoffs or drain lines
- Deep residential sinks: can reduce storage and complicate drain routing
- RV shower surrounds: fit tighter spaces better and are simpler to seal than mixed residential panel systems
RV bathroom material comparison
| Material | Typical Weight | Water Resistance | Best For |
|---|---|---|---|
| Sheet vinyl flooring | Lightweight | High | Small bathrooms, easy cleanup, low seam count |
| Vinyl plank flooring | Moderate | High when installed well | Owners who want a residential look without tile |
| Waterproof wall panels | Lightweight to moderate | High | Shower walls and splash-prone areas |
| Painted wallboard | Lightweight | Moderate | Dry areas away from direct spray |
| Composite vanity top | Moderate | High | Daily-use bathrooms that need low maintenance |
| Solid wood cabinetry | Heavy | Moderate | Limited use, only where weight budget allows |
| Acrylic shower surround | Lightweight | High | Fast installs and simple sealing |
| Tile and grout | Heavy | Variable in mobile use | Rarely the first choice for road-going RVs |
What tends to work best
The combinations that hold up best are usually straightforward and serviceable.
- Floor: sheet vinyl or carefully installed vinyl plank
- Shower wall: continuous or low-seam waterproof panel
- Vanity: compact composite or lightweight cabinet
- Hardware: corrosion-resistant pieces that can be tightened and serviced without tearing the room apart
- Lighting: LED fixtures rated for RV electrical systems
DIY can work here if the project stays cosmetic and the parts properly fit the coach. Trouble starts when a household fixture forces custom plumbing, blocks access panels, or adds enough weight to matter. At Motor Sportsland, we see fewer repeat repairs when owners choose parts built for RV dimensions and systems from the start.
Essential Plumbing and Electrical Know-How
A bathroom remodel usually stops being “just cosmetic” the moment you disconnect a faucet, shift a vanity, or replace a vent fan. That's where an rv bathroom renovation needs a little humility.
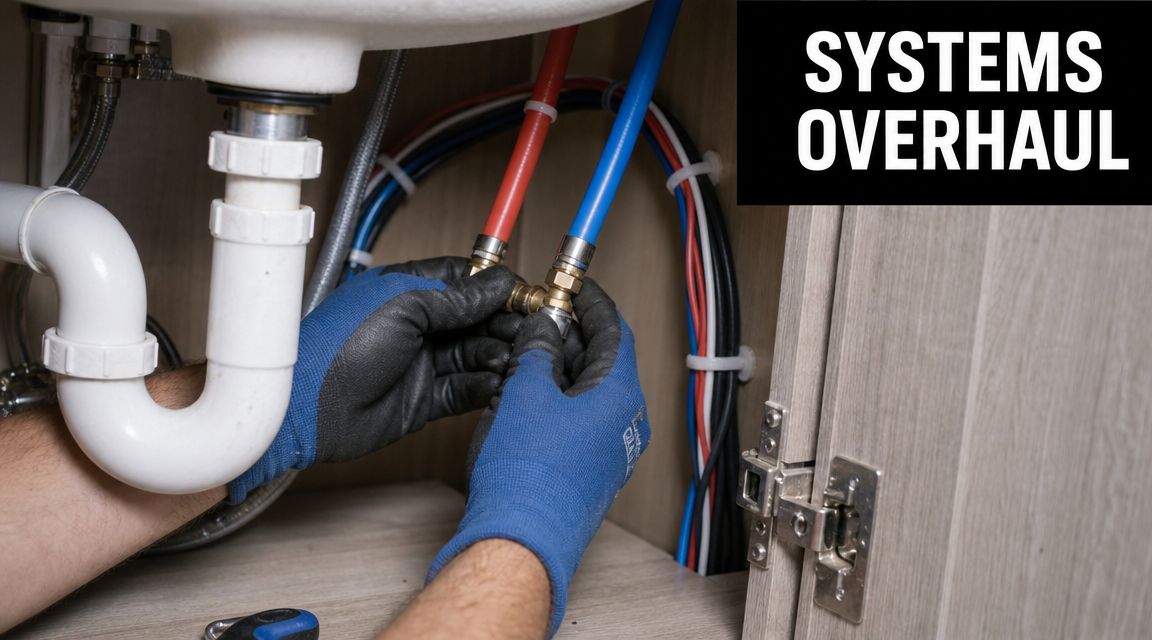
Plumbing mistakes that kill a project
The common assumption is that RV plumbing is simpler than house plumbing, so it's automatically easier. Sometimes it is. Sometimes that assumption creates the leak that ruins the new floor.
Most RV bathrooms use compact drain paths, limited access panels, and lightweight lines that don't forgive strain well. Replacing a faucet or RV toilet can be reasonable DIY work if the layout stays the same and the connections are easy to inspect afterward. Moving drains, changing toilet footprint, or reworking venting is a different job.
Watch for these failure points:
- Overtightened fittings: plastic parts crack more easily than people expect
- Unsupported plumbing runs: vibration turns minor movement into recurring leaks
- Bad drain slope assumptions: water has to leave cleanly in a small system
- Hidden access loss: beautiful panel work is useless if you can't service the trap or line later
If a new vanity blocks access to a pump line, shutoff, or connection point, the vanity is wrong even if it looks perfect.
Electrical work needs the same discipline
Bathroom lighting and fan upgrades are some of the most worthwhile changes you can make, especially after a shower at higher elevation where temperature swings can leave damp air hanging in a small room. But wiring work still deserves caution.
Simple fixture replacement can be manageable if you understand the RV circuit you're working on, disconnect power properly, and confirm wire type and load requirements. Adding circuits, re-routing hidden wiring, or tapping into systems you can't confidently identify is where DIY often stops being worth the risk.
Ventilation matters here too. Inadequate ventilation is a common cause of moisture problems and long-term deterioration. If you're evaluating fan performance, DLG Electrical's fan solutions give a useful overview of what strong bathroom air movement is supposed to accomplish, even though RV applications need compact, vehicle-appropriate equipment.
For owners who are also thinking about broader hot-water comfort during a bathroom upgrade, this guide on an instant hot water heater for RV use is worth reviewing before you lock in fixture choices.
What you can DIY and when to stop
Reasonable DIY jobs for many owners:
- Replacing a shower head
- Swapping a faucet like-for-like
- Changing light fixtures with matching specs
- Refreshing sealant where the substrate is still sound
- Installing shelves or mirrors into approved backing points
Jobs that usually deserve a technician:
- Re-routing supply or drain plumbing
- Changing toilet type or footprint
- Moving a shower pan
- Upgrading or adding vent fans where wiring or roof penetration is involved
- Any work that affects tanks, structural framing, or hidden electrical runs
A quick visual example helps before you start opening panels:
Avoiding Common RV Renovation Mistakes
A bathroom remodel can look sharp on delivery day and still fail by the end of the season. In RVs, the problems usually show up after a few trips. A little flex in the coach, one missed seal at a pipe penetration, or a cabinet that blocks pump access can turn a cosmetic upgrade into a repair job.
The two mistakes that cost owners the most are hidden moisture damage and budgets built too tight for what the coach needs. Once panels come off, it is common to find old sealant failure, soft wood around the toilet flange, or wall backing that will not hold new fasteners well. That is why I tell customers to leave room in the budget for substrate repair and leak correction, not just finishes.
The mistakes we see most often
- Using house-grade materials that do not hold up on the road: heavy tile, brittle trim, and rigid assemblies can crack, loosen, or pull away after repeated vibration.
- Missing waterproofing at the weak points: floor edges, inside corners, fixture penetrations, and the base of the toilet are where water gets in first.
- Building over service areas: a nicer vanity is not an upgrade if a technician has to remove it to reach a fitting, pump line, or shutoff.
- Treating ventilation like an afterthought: Utah's dry climate helps, but an RV bathroom is still a small, enclosed space that traps shower moisture fast.
- Spending the whole budget on visible parts: wall panels, fixtures, and hardware get attention. Rotted backing, failed caulk, and bad connections are what derail the job.
A simple rule helps here. If a change makes future inspection harder, reconsider it before you install it.
A better self-check before you start
Use these questions before you buy materials or start demolition:
- Can I identify soft flooring, delaminated wall panels, or past leak staining?
- Do the materials I picked belong in an RV, not just in a house bathroom?
- Will I still be able to reach plumbing connections and service points after the remodel?
- Can I dry-fit every major part before fastening it permanently?
- Do I have a plan to pressure-test water lines and check for trapped moisture before closing everything up?
If several of those answers are no, the project risk goes up quickly.
Another mistake is blaming the bathroom fixture when the problem originates upstream. Weak flow at the sink or shower is not always a bad faucet or clogged shower head. Sometimes the issue is coach-wide pressure loss, pump cycling, or a restriction elsewhere in the water system. Our RV water pump troubleshooting guide helps sort that out before you replace parts that were never the problem.
Good RV renovation work should stay quiet and predictable. No soft floor by the toilet. No trim coming loose after a run through Parleys Canyon. No drip that shows up only after the coach has been bouncing down I-15 for three hours.
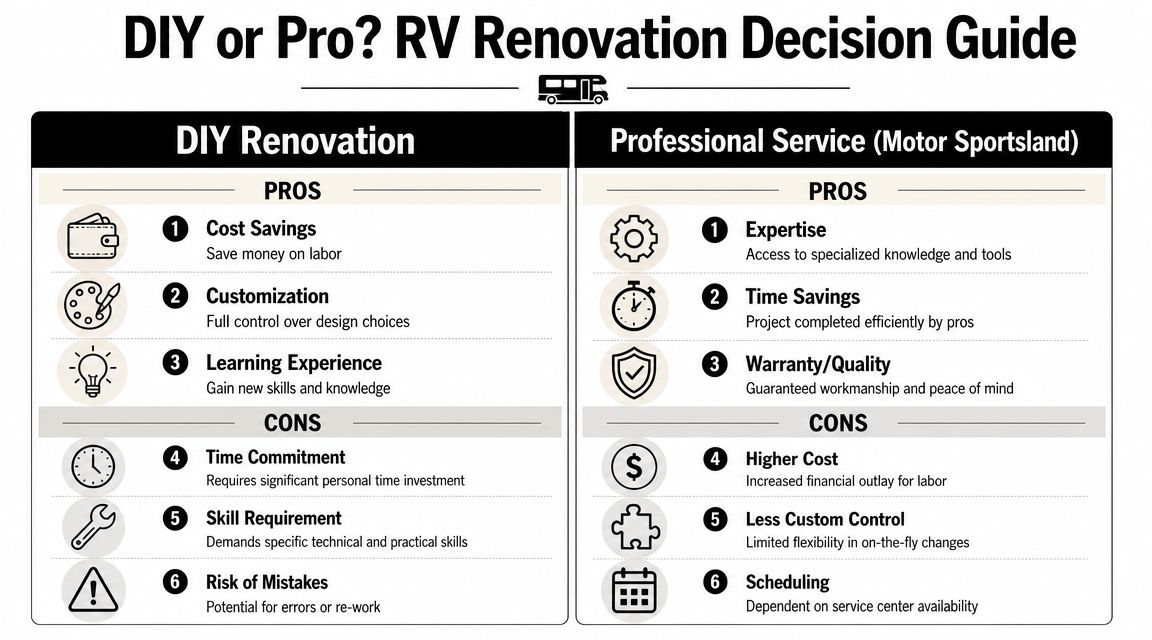
DIY or Call the Pros When to Use Motor Sportsland Service
A lot of owners can handle part of an rv bathroom renovation themselves. The key is knowing where your skills end and where risk starts costing more than labor would have.
DIY makes sense when
You're staying within the existing layout, using lightweight materials, and doing work you can fully inspect before the next trip.
DIY is usually reasonable for:
- Cosmetic updates: paint, hardware, mirror, trim, and storage accessories
- Like-for-like swaps: faucet, shower head, some lighting changes
- Simple finish work: recaulking, panel refresh, shelf installation
- Projects with no system rerouting: nothing moved, nothing hidden, nothing cut into structure
Professional service makes sense when
The smart time to bring in a shop is when the bathroom renovation touches systems you can't afford to guess on. That includes plumbing reroutes, tank-related changes, hidden water damage, ventilation upgrades with penetrations, and any remodel where fitment is tight enough that one bad cut means ordering parts again.
One more factor is resale. A key question with any RV bathroom remodel is whether it improves value or just satisfies personal taste. Value-preserving upgrades such as better ventilation, waterproof wall panels, LED lighting, and updated fixtures are often safer than heavy tile or trendy color choices that can narrow appeal in the used market, as discussed in this resale-focused RV bathroom perspective.
The decision checklist
If you're on the fence, use this short filter:
- Tools: Do you already have the right cutting, fastening, sealing, and testing tools?
- Time: Can the RV sit longer than planned if one part doesn't fit?
- Skill: Are you comfortable identifying RV plumbing and electrical components?
- Risk tolerance: If a leak shows up after the first travel day, can you diagnose it fast?
- Travel plans: Is this RV needed soon for a family trip or seasonal run?
When the project starts affecting structure, roof penetrations, tank connections, or hidden utility paths, professional service usually saves frustration. For owners who want a shop to handle those higher-risk jobs, Motor Sportsland service options include RV plumbing, electrical work, installations, repairs, and upgrade support.
Conclusion
A successful rv bathroom renovation comes down to discipline more than decoration. The good-looking remodel is rarely the one that wins long term. The durable one does. In a moving vehicle, the priorities stay the same every time. Protect the weight budget. Seal for moisture. Choose materials that handle vibration. Keep plumbing and electrical serviceable.
If you stay focused on those basics, even a small bathroom can feel dramatically better to use. A brighter wall finish, a more efficient vanity, better airflow, and smarter waterproof materials can make your RV easier to live with on weekend trips and long Utah travel days alike.
The projects that go wrong usually go wrong for predictable reasons. Owners rush measurements, borrow household products that aren't built for road movement, or bury service access behind nice-looking trim. The projects that hold up are the ones planned like systems work.
If you want ideas, inspiration, or a realistic second opinion before you buy parts, it helps to compare your plan against how the RV is built and used.
Frequently Asked Questions About RV Bathroom Renovations
How long does a typical RV bathroom renovation take
A simple cosmetic refresh can fit into a weekend if all materials are ready and no hidden repairs show up. A larger tear-out with fixture replacement, waterproofing, and system work usually takes longer, especially when parts have to be ordered and tested before travel.
Can I put a residential toilet in my RV
Usually, that's not the first choice. Residential toilets can add weight, use more water, and may not match the black tank setup or footprint of the original bathroom. RV-specific toilets are typically the safer fit for size, water use, and serviceability.
What's the best way to waterproof an RV shower
Use lightweight, bathroom-rated materials with flexible sealants and careful treatment at every wall-to-floor transition and penetration. Continuous-surface or low-seam waterproof wall panels are usually a better road-going solution than tile and grout.
How much value does a bathroom renovation add to my RV
It can improve enjoyment immediately, but resale impact depends on the quality and style of the work. Clean, functional, lightweight updates usually preserve appeal better than highly customized finishes that only match one owner's taste.
If you're comparing ideas for your own project, browse Motor Sportsland for RV inspiration, then talk through the practical side before you start cutting. A smart bathroom remodel should make your RV easier to use in Utah, not harder to maintain after the first trip.
