
RV Tire Maintenance: Essential Tips for 2026
You're loading up for a weekend at Jordanelle or pointing the nose south for a longer run out of Utah, and the same thought hits right before you pull out: are the tires ready?
That question matters more on an RV than it does on a car. RVs carry heavier loads, sit for longer stretches, deal with stronger sun exposure, and in Utah they also face mountain grades, long freeway miles, and big temperature swings between seasons. A tire that looks fine in the driveway can still be the weak point on the road.
Around our Salt Lake City dealership, we keep coming back to four basics for RV tire maintenance: pressure, age, load, and visual inspection. If you stay on top of those four, you prevent most of the problems that strand people on the shoulder of I-15 or create handling issues coming down a canyon road.
We've helped Utah RV owners for over 55 years, and one thing is consistent. Generic tire advice causes trouble. The details matter. This guide gets into the practical side of RV tire maintenance, especially the part many owners miss: setting tire pressure based on the RV's real loaded weight, not guesses, not habits, and not the number stamped on the sidewall.
Introduction
RV tires don't fail for the same reasons car tires do. They spend a lot of their life carrying near-capacity loads, sitting through storage periods, and then getting asked to work hard all at once on a hot road, a steep climb, or a long towing day across Utah.
That's why RV tire maintenance needs a different mindset. You're not just checking whether there's tread left. You're managing heat, weight, age, and condition. A tire can have decent-looking tread and still be overdue for replacement. It can also be inflated to the wrong pressure even when the number “looks right” on a gauge.
Our service team sees the same pattern with new owners. They check air once in a while, glance at the tread, and assume they're good. The better routine is simple: check cold pressure on schedule, inspect for visible damage, know the tire's age, and match inflation to the load the RV is carrying. That routine works whether you're heading into the Wasatch Mountains, crossing Wyoming winds, or parking for the winter along the Wasatch Front.
Why RV Tires Are Not Just Bigger Car Tires
The assumption that an RV tire is just a bigger car tire leads to expensive mistakes.
We see it at Motor Sportsland when a new owner pulls into our Salt Lake City service drive after a trip over Parley's Canyon or down I-15. The tires may still have tread. They may even look fine at a glance. But the tire was being used like a passenger tire when it was dealing with heavy, sustained load, long heat cycles, and side-force from wind and grade changes.
That job is different from the start.
Passenger tires are built with ride comfort and everyday handling in mind. RV tires, especially trailer tires, are built to carry weight steadily, stay stable, and control sway. Motorhome tires add another layer because they also have to steer, brake, and support a tall, heavy vehicle for long stretches between stops. In Utah, that difference shows up fast on climbs, rough pavement, and long highway days where there is no quick exit or short tow back to town.
What RV tires deal with that car tires usually do not
RV tires spend more of their life near their working limit. That matters because heat is the enemy, and heat builds when a tire carries heavy load for miles at highway speed.
Common stress points include:
- High sustained load for long periods, not just short trips around town
- More sidewall stress from a taller, heavier rig that moves in crosswinds
- Long storage gaps that age the tire even when tread still looks usable
- Sharp seasonal swings in Utah that change pressure and expose weak tires faster
Trailer tires are a good example. Their job is not to cushion passengers. Their job is to hold weight steady and track straight behind the tow vehicle. That is why sidewall stiffness, load rating, and correct application matter so much more than many new owners expect.
The sidewall is only part of the story
Owners often read the sidewall, see a maximum pressure number, and assume that is the setting they should use every time. That shortcut causes problems.
The sidewall tells you the tire's size, construction, load range, and the pressure tied to its maximum rated load. It does not automatically tell you the correct day-to-day pressure for your specific RV as loaded for travel. The right way to set pressure is based on the RV manufacturer's guidance and, even better, actual loaded wheel or axle weights matched to the tire maker's load-and-inflation table. That is the step many generic tire guides skip, and it is where we see owners get into trouble.
A tire can be the correct size and still be run at the wrong pressure for the weight it is carrying.
Why this matters more in Utah
Utah driving exposes weak tire habits quickly. A trailer that feels acceptable on flat local roads can start to sway more on a downhill curve. A motorhome with pressure set by guesswork can build excess heat on a summer climb. A tire that seemed fine during storage can show cracking after months of high sun and dry air.
Here is how the local conditions stack the deck against neglected tires:
| Utah condition | What it does to RV tires |
|---|---|
| Mountain grades | Increases heat under load during climbs and braking stress on descents |
| Long travel days | Gives slow leaks, imbalance, and underinflation more time to turn into failures |
| High sun exposure | Speeds rubber aging and sidewall deterioration during storage |
| Seasonal storage | Raises the risk of flat spotting, weather checking, and overlooked damage |
Cold weather matters too. If you store your RV through a Wasatch Front winter, basic prep helps protect more than the tires. A good vehicle winterization guide can help you think through the bigger storage picture.
The main takeaway is simple. RV tires are load-carrying safety parts, not oversized car tires. Treat them that way, and your pressure checks, weight checks, and replacement decisions start to make a lot more sense.
Your Pre-Trip RV Tire Inspection Checklist
You are fueling up in Nephi or Beaver, the trailer is loaded, the kids are settled, and the road ahead includes a long climb or a windy canyon. That is the wrong time to wonder whether a tire looked a little low back at home. A pre-trip inspection gives you one clean chance to catch the problems we see most often at our Salt Lake City service department, underinflation, sidewall damage, uneven wear, and loose hardware.
This visual can help you build the habit.
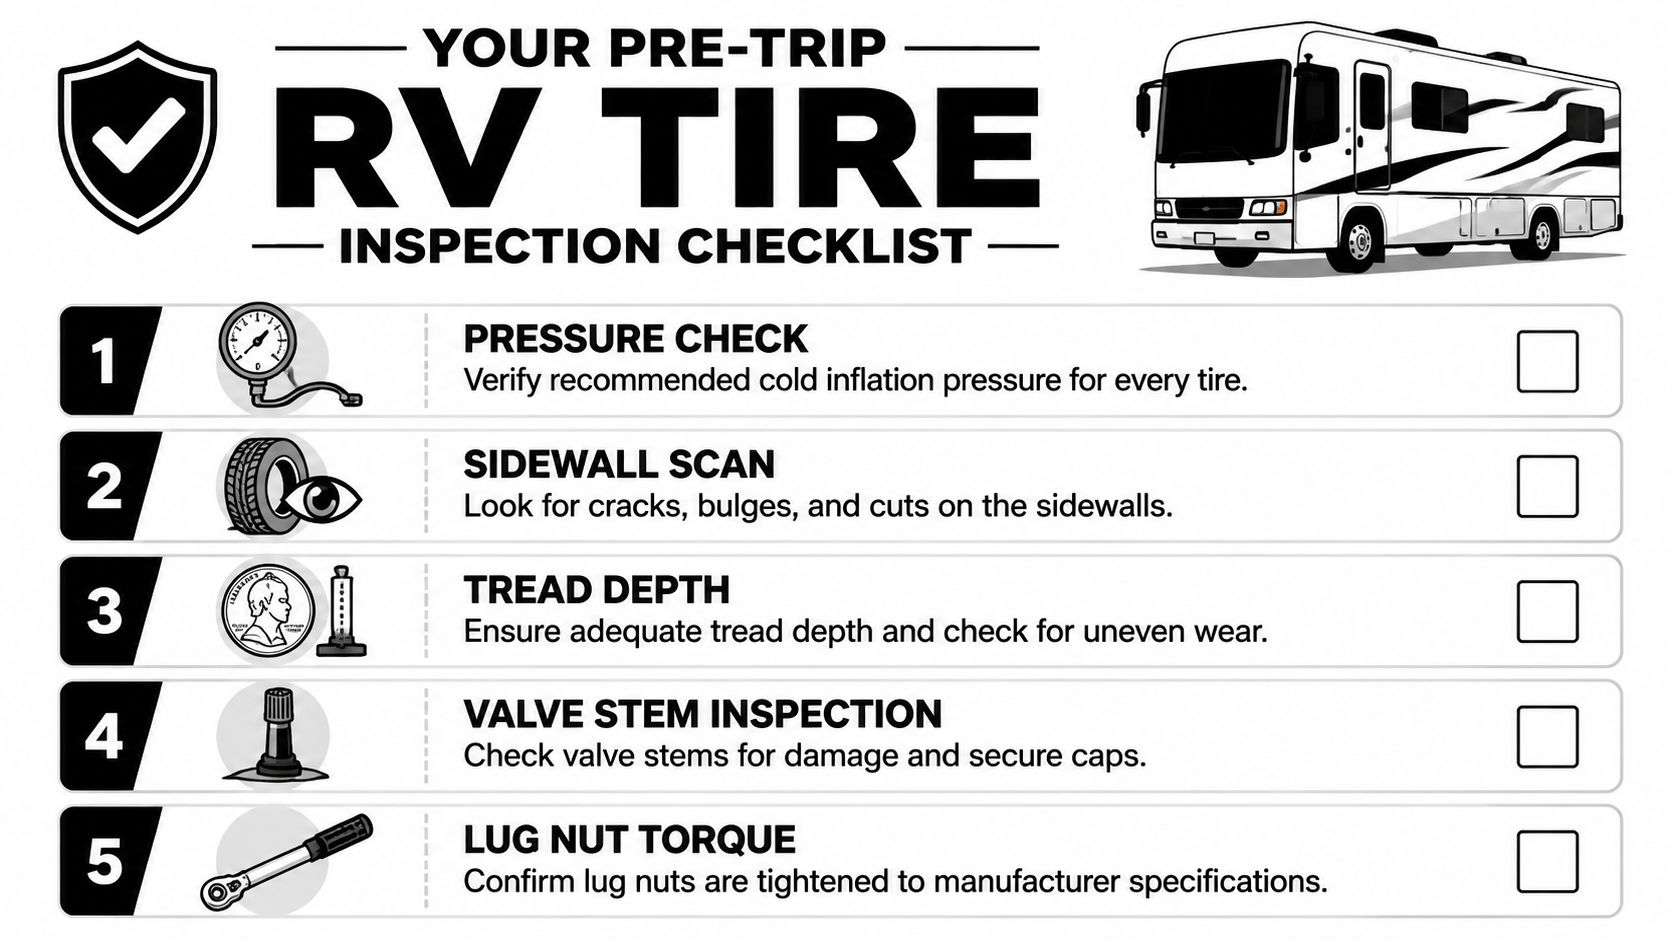
Start with cold pressure
Check tire pressure before the day starts, before the rig moves, and before direct sun warms one side more than the other. Hot tires read higher, so a pressure check after you have been driving does not tell you what your starting inflation really was.
Use a quality gauge and check every tire one by one. Duals can be different. Trailer tires can be different. The tire that causes trouble is usually the one the owner assumed matched the others.
Follow this routine:
- Check every tire individually.
- Compare each reading to your RV's recommended cold setting. Use the sticker on the RV as your starting point for the trip, then fine-tune pressure later based on actual scale weights and the tire maker's load table.
- Add air before travel if needed. Do not bleed off pressure from a hot tire unless you are addressing a service issue.
If you're also getting the rig ready for cold-weather storage or shoulder-season travel, this vehicle winterization guide has a helpful overview of weather-related prep habits that pair well with tire care.
Inspect what your eyes can catch
Walk each tire slowly and look at the whole assembly, not just the tread face.
Look for:
- Sidewall cracking from sun exposure and age
- Bulges or bubbles that point to internal damage
- Cuts, scrapes, or chunking from curbs, gravel, or road debris
- Nails, screws, or stones lodged in the tread
- Valve stem damage or missing caps
- A tire that sits lower or looks different than the one beside it
That last one matters. A single tire wearing differently can point to an alignment issue, a suspension problem, or a load problem on one side of the coach. If your trailer has a history of sway or unstable handling, tire condition is only part of the picture. Our guide on how RV sway control affects towing stability can help you spot the bigger setup issues.
A quick video can also help newer owners see what a proper inspection looks like in practice.
Check tread depth with some margin
The old penny check still works as a quick screen. If tread is getting shallow, plan for replacement before you are down to the legal minimum, especially on steer tires or on any RV headed across Utah for a long summer trip.
We advise owners to look for more than raw depth. Uneven wear tells a better story than a single number:
- More wear in the center can mean inflation has been too high for the load
- More wear on both shoulders can mean chronic underinflation
- One-sided wear can point to alignment or suspension trouble
- Cupping or scalloping often shows shock or balance issues
A tire can have usable tread and still be a bad travel tire.
If you only have time for one walkaround before a trip, spend it on your tires.
The Truth About Load and Inflation Pressure
This is the part of RV tire maintenance that gets skipped most often, and it's where a lot of preventable trouble starts.
Many first-time owners get stuck on tire pressure because they miss a key step: weighing the rig. Proper inflation must be based on the RV's actual load, not just a generic number on the sidewall, and overloading is a primary cause of tire failure, as explained in RV LIFE's RV tire maintenance guide.
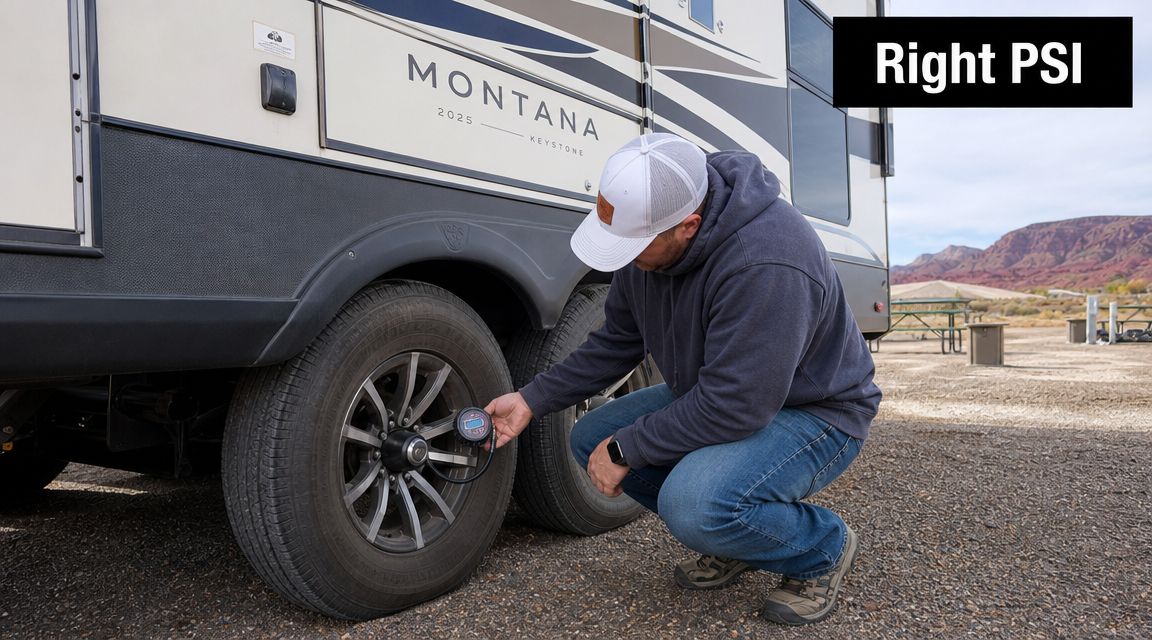
The sidewall shortcut is what doesn't work
We see this all the time. An owner inflates every tire to the maximum pressure molded into the sidewall because it feels safer. Sometimes that creates a harsh ride and uneven contact. Other times it still doesn't solve the underlying problem because the load distribution is wrong.
The better approach is to use the RV's actual traveling weight.
That means thinking about the rig the way you really use it:
- fresh water or empty tanks
- generator and batteries
- tools and camping gear
- food
- toy hauler cargo
- passengers
- hitch weight and balance
A weekend trailer packed light and the same trailer packed for off-grid camping are not carrying the same load. They should not be treated the same.
How to set pressure the right way
Use this order:
Find the tire-and-loading placard
On many motorhomes, it's near the driver area. On many towables, it's commonly near the front roadside area or another manufacturer-specified location.Load the RV as you typically travel
Put in the gear, water, food, and toys you normally bring.Weigh the rig
A certified public scale is the practical starting point. If you can get individual wheel position weights, even better.Use the tire maker's load and inflation table
That gives you a pressure target based on real load, not assumptions.
For owners who want to compare examples of how charts are laid out, RVupgrades.com's tire pressure guide is a useful reference point. The exact chart you use should still match your specific tire brand and model.
Why this matters more in Utah
Utah makes bad load habits obvious. A trailer that feels “fine” on flat roads can start pushing, wandering, or heating tires on long grades. Add strong side winds or a poorly balanced toy hauler and the handling gets worse fast.
That's one reason we talk with owners about cargo placement and hitch setup right alongside tire pressure. If you're fighting movement while towing, our overview of RV sway control basics is worth reading too. Tire pressure and sway control are connected more often than people think.
A pressure number without a weight number behind it is just a guess.
A simple decision table
| Situation | Better move |
|---|---|
| You've never weighed the RV fully loaded | Weigh it before your next long trip |
| You changed cargo, added batteries, or travel with toys | Recheck load and inflation setup |
| One side carries visibly more gear | Treat uneven loading as a tire issue, not just a storage issue |
| You tow mostly in mountains | Be more disciplined about load-based inflation, not less |
If you remember one thing from this section, make it this: the correct pressure is the pressure that matches the load your RV is carrying.
Decoding Tire Age and Knowing When to Replace
Unlike car tires, many RV tires need replacement because of age before the tread looks used up. We see that often at our Salt Lake City dealership, especially on rigs that spend long stretches parked, then head straight for a mountain trip.
Age matters because RV tires live a harder life than they appear to. Long periods of sitting, heavy loads, sun exposure, and heat cycles all work on the casing and sidewall. In Utah, dry air, strong UV, and long highway runs between stops speed that process up.
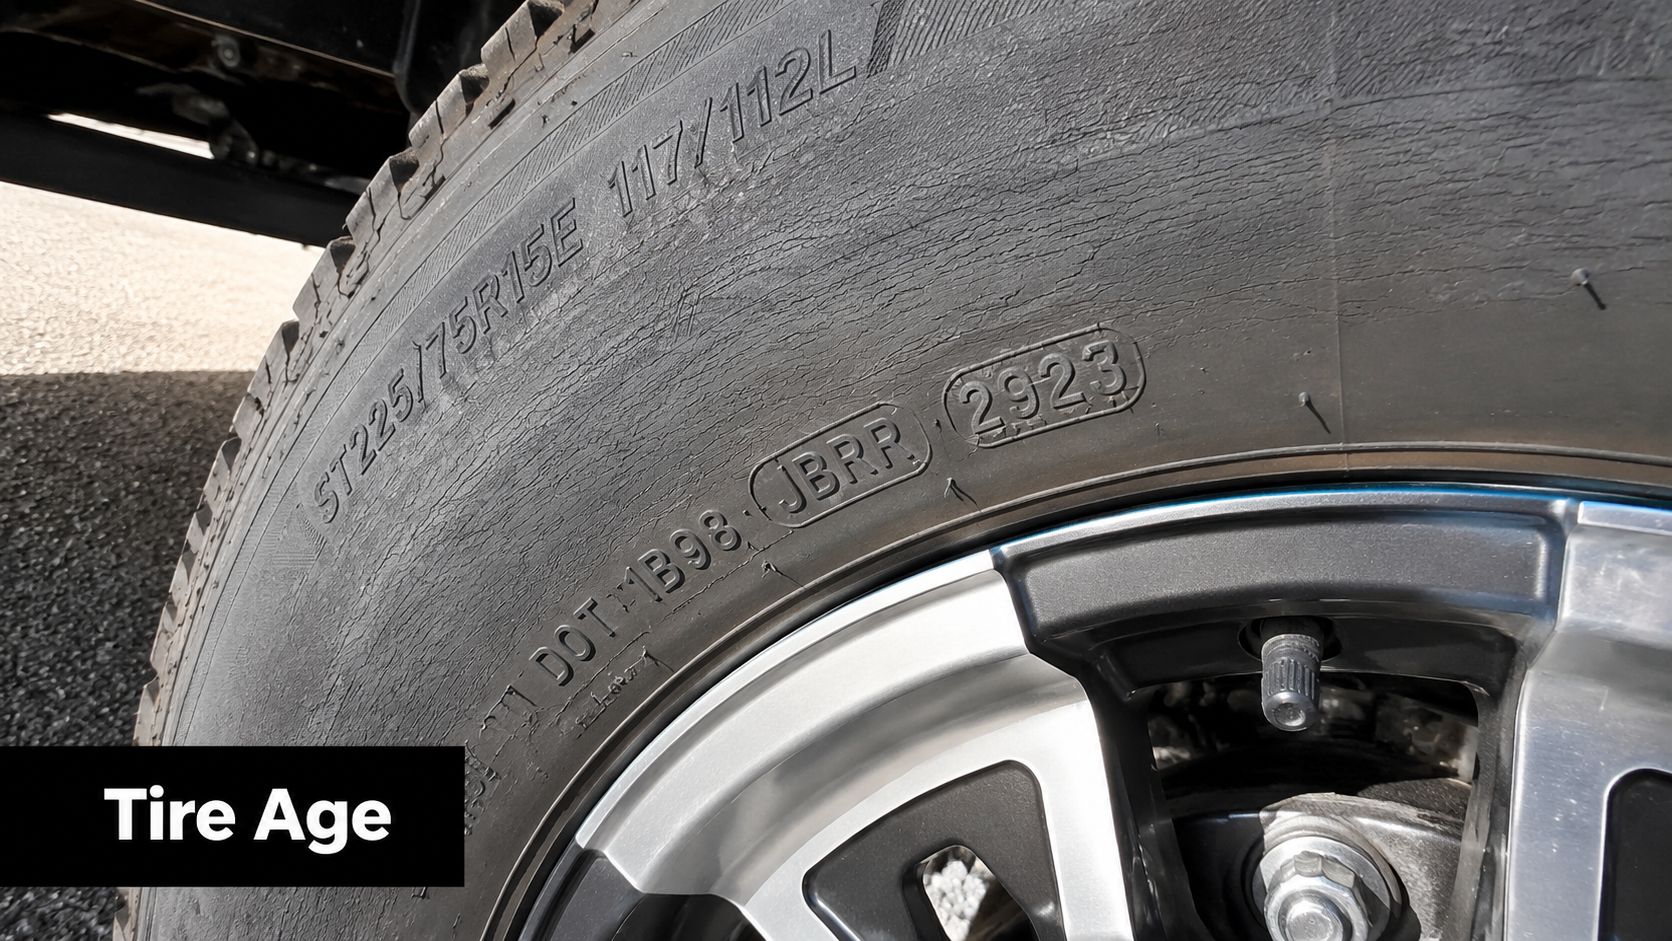
How to read the DOT date code
Check the tire sidewall for the DOT marking. The last four digits show when the tire was built.
- First two digits are the production week
- Last two digits are the production year
That date is one of the first things we check on a used RV. Tread can look clean and still hide an aging tire that is no longer a smart choice for summer travel through Utah.
What aging looks like in real life
Aging usually shows up in the sidewall before it shows up in the tread. Watch for:
- Fine cracking in the sidewall
- Dry or chalky-looking rubber
- Bulges or deformation
- Weathering from sun and ozone
- A tire that looks decent on the tread face but worn out around the sidewall
Some tires fail without dramatic warning signs, which is why date code matters so much. A visual check helps, but it is not the whole decision.
Replace on age, condition, and trip demands
There is no single date that fits every tire, every brand, and every RV. The safer approach is to treat tire age as a service decision, not a tread decision. If the tires are getting older, the sidewalls are showing weathering, and you are planning a loaded trip across I-15, I-70, or the Wasatch grades, replacement deserves a serious look now, not after one more season.
That trade-off is real. Replacing a full set early costs money. Running an older set until failure can cost a lot more in body damage, roadside downtime, and loss of control.
Pay even closer attention if the RV:
- sits for much of the year
- is stored outside in direct sun
- has an unknown tire history
- is headed out on long-distance or mountain travel
For a broader look at RV tire care and safety while traveling, our team put together a separate guide that covers road-use habits and warning signs.
If your tires are already in the age range where replacement is being considered, and you are about to ask them to carry full load through Utah heat and elevation, replacing them is usually the safer call.
Storage, TPMS, and In-Motion Care
You are three hours into a summer pull south of Salt Lake City, the trailer is loaded, and one tire starts losing pressure slowly enough that you cannot feel it from the driver's seat. That is how a routine travel day turns into body damage on the shoulder. A good storage routine helps prevent tire problems. A TPMS helps you catch the ones that still develop on the road.
What a TPMS does for you on the road
A tire pressure monitoring system watches each tire while you drive and warns you when one drops pressure or runs hotter than the rest. For RVs, that matters more than many new owners expect. By the time a heavy trailer tire looks wrong in the mirror, the casing may already be failing.
We recommend TPMS most strongly for owners towing long distances across Utah. Heat builds fast on I-15, I-80, and southern Utah pavement, and long grades add load on the way up and braking stress on the way down. On multi-axle trailers, an inside tire can have a problem that stays hidden until it comes apart.
TPMS is not a substitute for setting cold pressure from actual wheel position weights. It is an early-warning tool. Use it to catch a puncture, a leaking valve stem, or a brake or bearing issue that shows up as one wheel running hotter than the others.
We especially like TPMS for:
- Long travel days where a small pressure loss can turn into a failure before the next fuel stop
- Multi-axle trailers where one bad tire is hard to spot from the cab
- Toy haulers and heavier fifth wheels that see load changes from trip to trip
- Summer travel when road heat adds stress to already loaded tires
How to store RV tires the right way
Utah storage is hard on tires. High UV exposure, dry air, and long periods of sitting age sidewalls faster than many owners realize. We see plenty of rigs in spring with tires that still have tread but show cracking, flat spotting, or weathering from months parked in the same position.
The goal in storage is simple. Reduce sun exposure, avoid sitting on wet or dirty ground, and inspect before the first trip, not on departure morning.
Our shop checklist looks like this:
- Use tire covers if the RV is stored outdoors in direct sun
- Park on a clean, dry surface when possible
- Avoid storing near motors, generators, or welding equipment that can expose tires to ozone
- Move the RV during long storage periods so the same section of tire is not carrying the load month after month
- Check pressure before and during storage because a tire that sits low is easier to damage
- Do a full inspection before spring travel with close attention to sidewalls, valve stems, and uneven shape
If you want more road-use habits and travel warning signs, our guide on RV tire care and safety while traveling is a helpful companion.
In-motion habits that protect the tire after you leave
Driving style matters. Fast cornering, curb contact, and running long stretches over speed rating all add heat and stress to the casing. On mountain routes, speed control matters even more. A heavy RV that is pushed too hard downhill can overheat brakes and transfer extra heat into the wheel end and tire.
Make a habit of checking the TPMS display at fuel stops and walk-arounds. Look for one tire that is trending differently from the others. Small differences are normal. A single tire that starts climbing in temperature or dropping pressure deserves attention before you keep rolling.
That is the practical side of tire care. Store them in a way that slows aging, monitor them while you travel, and treat changes in pressure or temperature as an inspection issue right away.
Tools, Torque, and When to Call for Service
The right tools make RV tire maintenance easier, but only if you use them correctly. We'd rather see an owner with three good tools and a solid routine than a garage full of gadgets and no process.
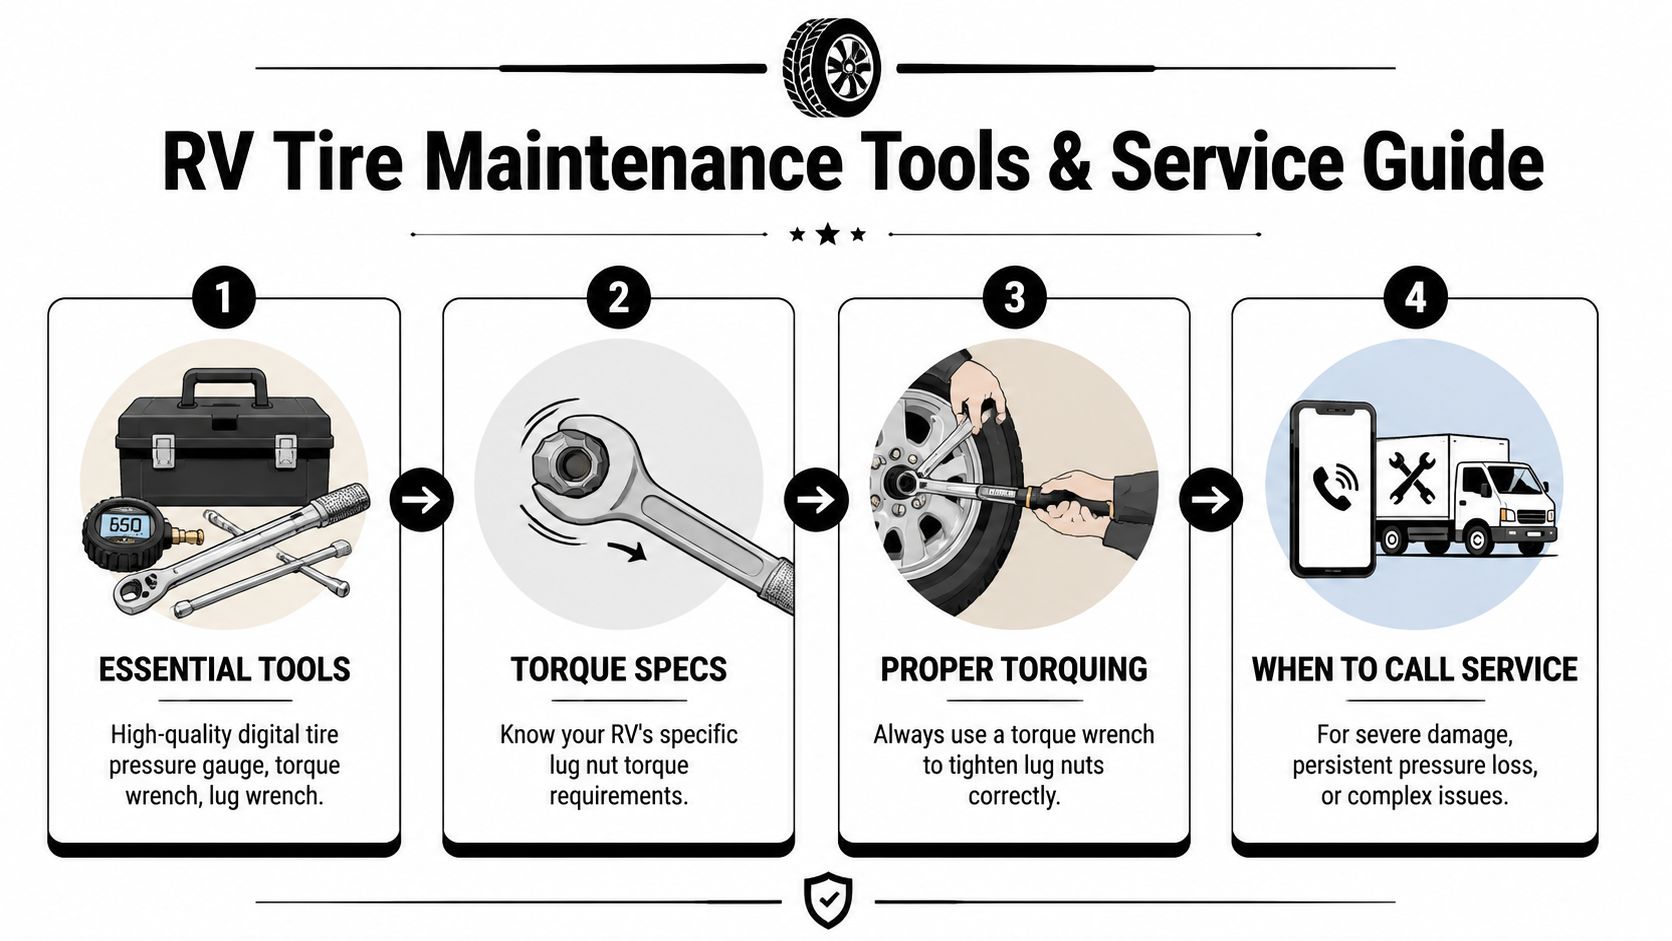
The tools worth carrying
A basic RV tire kit should include:
- A quality digital pressure gauge so you can check cold inflation accurately
- A portable air compressor that can reach your RV's required pressure range
- A torque wrench matched to your wheel hardware requirements
- A tread depth gauge if you want something more precise than a coin check
- Valve caps and spare stems for simple fixes and inspections
Lug nut torque matters more than many first-time owners realize. Wheels need to seat evenly. Tightening in a star pattern helps avoid uneven clamping.
The exact torque specification depends on the RV and wheel setup, so use the manufacturer's requirement for your rig. This is one area where guessing creates expensive problems.
Read the wear pattern before you replace the tire
A tire can tell you more than “I'm worn out.”
Common patterns often point to a deeper issue:
| Wear pattern | What to investigate |
|---|---|
| Center wear | Inflation may be too high for the load |
| Edge wear on both sides | Inflation may be too low |
| One-sided wear | Alignment, suspension, or axle issue |
| Cupping or patchy wear | Balance or running gear problem |
That's why replacing the tire alone doesn't always solve the root cause. If the wear is uneven, the RV may need alignment or a running-gear inspection.
Minder Research notes that a complete RV tire maintenance workflow includes rotation and balancing every 7,500 miles, and it also warns against tire dressings containing petroleum or alcohol because they can speed sidewall cracking, as covered in this RV tire safety article from Minder Research.
When it's time to hand it off
DIY checks make sense. So does knowing your limit.
Bring the RV in for service when you have:
- Persistent pressure loss
- Visible bulges, cuts, or deep cracking
- Uneven wear you can't explain
- Vibration that didn't used to be there
- A tire age question on a used RV
- A need for balancing, alignment, or replacement
If you want a shop to inspect tires, wheels, and related running gear, our RV service department handles routine maintenance and inspection work along with broader chassis-related checks.
FAQ About RV Tire Maintenance
How often should I check RV tire pressure?
Check pressure before every trip day, not just once a month. In Utah, a coach can leave the Salt Lake Valley on a cool morning, climb into hotter pavement and long grades, and put a lot more stress on an already marginal tire.
We tell owners to check pressure when the tires are cold and to recheck during heavy travel periods. If the RV has been loaded differently for a long trip, confirm your pressures still match the actual wheel weights and the tire load chart you are using.
Should I use the PSI on the tire sidewall?
Use the pressure that matches your real load, your RV, and your tire manufacturer's load-inflation table. The number on the sidewall is the maximum pressure for that tire at its maximum rated load, not a universal setting for every coach using that tire.
This is one of the biggest mistakes we see in service. A pressure that is too high for the measured load can hurt ride quality and wear. A pressure that is too low builds heat, and heat is what ruins RV tires on long highway runs.
How do I know if my RV tires are too old?
Start with the DOT date code on the sidewall. The last four digits show the week and year the tire was built.
Age alone does not tell the whole story. We see tires in Utah that age faster because they sit for long periods, carry heavy loads, and spend time in strong sun and dry air. If you bought a used RV and do not know the tire history, have the tires inspected sooner rather than later, even if the tread still looks usable.
What should I look for during a visual inspection?
Look for sidewall cracking, bulges, cuts, exposed cords, tread damage, and anything stuck in the tire.
Then compare all the tires to each other. If one tire has a different shoulder shape, a different wear pattern, or keeps losing pressure, that usually points to a load, alignment, valve stem, or wheel problem instead of random bad luck.
Do RV tires need special care during storage?
Yes. Sun, long stationary periods, and underinflation during storage all shorten tire life.
Keep tires clean, covered, and inflated for the stored load. Avoid parking for long periods on wet ground or surfaces that hold heat. If the RV will sit for a while, moving it occasionally can help reduce flat spotting, but proper inflation and weight management matter more than rolling it a few feet.
When should I schedule professional tire service?
Schedule service if a tire will not hold pressure, shows visible damage, wears unevenly, or starts vibrating. It also makes sense before a long mountain trip, after a hard curb strike, or anytime you need help matching scale weights to the right pressure.
That last one matters more than many owners realize. Generic tire advice only gets you so far. The safer approach is to weigh the RV as it is used, then set pressure from the tire maker's chart with a margin that fits real travel conditions.
If you want a second set of eyes on your RV before your next trip, contact Motor Sportsland to schedule a tire inspection or service visit. You can also browse current inventory online, stop by our Salt Lake City area showroom, or talk with our team in Millcreek or Spanish Fork about finding an RV that fits the way you travel in Utah.
