
Motorhome Roof Maintenance a Utah Owner’s Guide for 2026
You're probably standing next to your motorhome right now, looking up at the roof and wondering if it really needs attention before your next Utah trip. That's a fair question. A roof can look fine from the ground and still be one hard storm, one dried-out seam, or one missed crack away from letting water into the coach.
That's why motorhome roof maintenance matters so much here. Utah gives RV roofs a rough mix of high-altitude sun, dry heat, spring wind, dusty summer roads, and heavy winter snow in places along the Wasatch Front and up toward Park City. A small issue that goes unnoticed in storage can turn into stained ceiling panels, soft decking, rotten framing, and cabinet damage by the time camping season starts.
Most new owners don't need complicated theory. They need a clear way to understand their roof, inspect it safely, clean it with the right products, and know when to stop climbing and call for help. That's especially true if heights make you uneasy. Plenty of owners feel that way, and a good maintenance plan should account for it. This guide does exactly that, with practical roof care advice shaped for Utah conditions and real ownership.
Your Motorhome's First Line of Defense Understanding Your Roof
A lot of first-time owners look at the roof and see one big white surface. In the shop, we see a system with several common leak points. The membrane or shell matters, but most water intrusion starts at openings and edges: vent flanges, skylights, AC gaskets, antenna mounts, ladder attachments, and termination rails. If you understand what your roof is made of, you make better decisions on cleaners, sealants, inspection intervals, and repair methods.
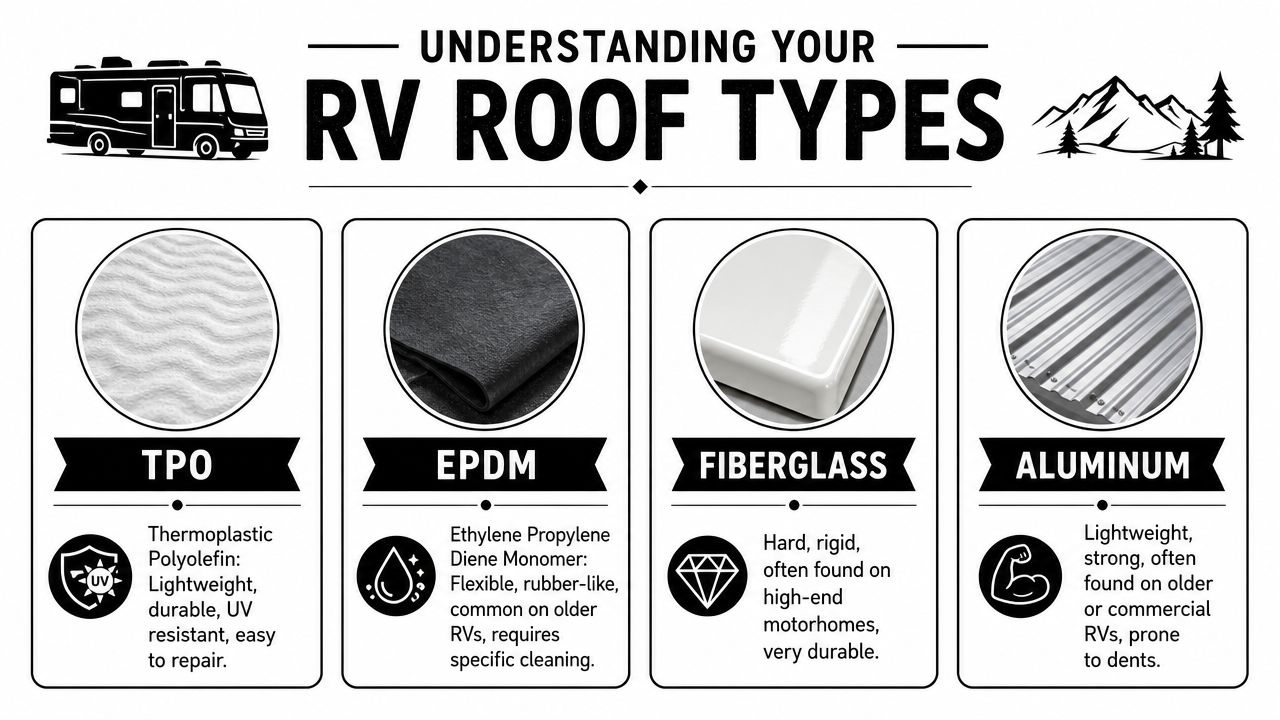
The four roof types most owners will see
Here's the quick breakdown our industry uses for owner discussions about long-term upkeep.
| Roof material | What it feels like | Common ownership reality |
|---|---|---|
| EPDM | Rubbery and flexible | Common and serviceable, but it needs compatible cleaners and regular sealant checks |
| TPO | Flexible like rubber, often smoother | Also common, lightweight, and fairly straightforward to patch when damage is caught early |
| Fiberglass | Hard and glossy | More rigid, often found on higher-end coaches, with good weather resistance but still dependent on sound seam sealing |
| Aluminum | Metal panel feel | Durable and long-lasting, though it can dent and still develop problems at fasteners and seams |
EPDM and TPO are the roofs we see most often on motorhomes because they keep weight and cost reasonable. Fiberglass usually holds up well cosmetically, but it is not maintenance-free. Aluminum lasts a long time in many applications, though impact damage and seam movement still deserve attention. For a general home-maintenance comparison of how surface care habits affect roof life, Seattle homeowner roof care offers a useful outside perspective, even though RV roofs have different materials and flex under travel.
How to identify your roof without guessing
Owners guess wrong all the time, especially from the ground.
Use a few practical checks together. Press lightly on the surface in a safe area. EPDM and TPO usually have some give. Fiberglass feels hard and finished. Aluminum looks and feels like sheet metal. Then confirm it with the owner's manual, build sheet, or manufacturer information before you buy any cleaner, lap sealant, coating, or patch kit.
One bad product choice can create more work than the original problem.
Why Utah changes the trade-offs
Salt Lake City and the rest of northern Utah are hard on RV roofs in specific ways. High-altitude UV dries and ages exposed sealants faster than many new owners expect. Summer heat bakes the roof, cold nights tighten materials back up, and that constant expansion and contraction works on every seam and penetration. If the coach sits outside along the Wasatch Front, windblown grit also scuffs surfaces and holds dirt around sealant edges.
Snow load matters too. A coach stored in the valley may only need occasional winter checks, while one kept near Park City, Heber, or other higher-elevation areas can carry heavy snow for long periods. The roof material affects wear, but the bigger concern is often what snow and ice do to caulked joints, plastic vent housings, and pooled meltwater around low spots.
The roof membrane rarely fails first. Sealant and attachments usually do.
What owners with a fear of heights should know
A lot of people are uneasy on an RV roof, and that is a real maintenance factor, not a personal flaw. If you rush up there while nervous, you miss details, step where you should not, or avoid the inspection altogether. I'd rather see an owner do a careful ladder-edge check with binoculars than force a full roof walk in bad conditions.
If heights are a problem, set a seasonal plan now. Do ground-level checks after windstorms, use a stable ladder on level pavement, inspect the front and rear caps from the ladder, and schedule a professional roof inspection before winter storage and again in spring. That approach works well for Utah owners because the biggest seasonal stress periods are predictable.
Manufacturers commonly call for routine preventive roof checks, especially at seams and around penetrations. On coaches that live outdoors through Utah sun and snow, I advise owners to treat roof care like scheduled service, not an occasional cleanup job. The owners who stay ahead of leaks are usually the ones who respect the roof as a collection of parts that all need attention, not a single panel that only matters once water gets inside.
The Proactive RV Roof Inspection Checklist
A proper roof inspection isn't just a glance for obvious cracks. It's a habit. Plenty of roofs that look “recently sealed” still leak because the repair only improved appearance, not waterproof performance. Service pros report that 40% of resealed roofs still have issues because cosmetic fixes don't address hidden moisture or failed sealing underneath, as noted in this analysis of critical RV roof mistakes.
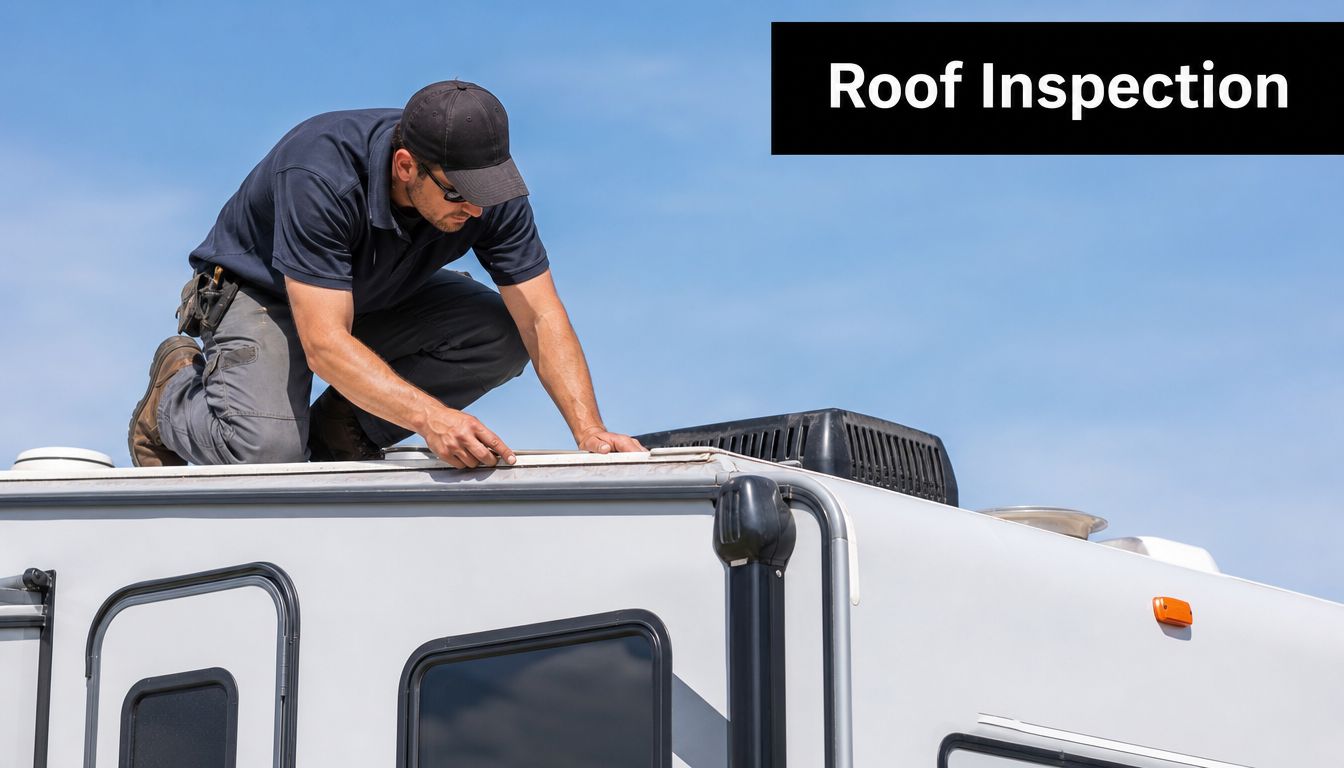
What to check from the roof surface
When conditions are dry and you can get up there safely, inspect slowly instead of trying to cover the whole roof in two minutes.
- Sealant condition: Press lightly on lap sealant around vents, skylights, AC units, and front and rear seams. Good sealant still has some pliability. If it feels brittle, separates at the edge, or has visible gaps, it needs attention.
- Surface damage: Look for punctures, tears, gouges, open seams, bubbles, or spots where debris sat for too long.
- Attachment points: Check mounts, trim rails, ladder connections, and anything screwed through the roof plane.
- Water pattern clues: Dirt trails, staining, or unusual streaking often point to a path water has already taken.
- Debris traps: AC units, vents, and skylights collect needles, leaves, and grit. Those are problem areas because debris holds moisture and stresses sealant.
How to validate that your maintenance is working
The most common mistake is judging the roof by color and shine. A clean roof can still leak.
Use this field check:
| Area | What good looks like | What suggests trouble |
|---|---|---|
| Lap sealant | Continuous bead, bonded edges, slight flexibility | Cracking, lifting, pinholes, edge separation |
| Roof skin | Even surface, no soft feel | Spongy spots, waviness, delamination near edges |
| Inside ceiling | Dry trim, no discoloration | Stains, odor, bubbling wallcovering |
| Corners and cabinets | Solid and dry | Musty smell, dampness, swelling |
Don't stop at “it looks sealed.” Press on it. Check inside the coach. Feel for soft spots around the perimeter.
Ground-level inspection if you don't want to climb
Fear of heights is real, and motorhome roof maintenance advice often ignores that. It shouldn't. If you're uncomfortable getting on the roof, don't force it.
Use a no-roof-access routine instead:
- Binocular sweep: Stand back and scan seams, AC shrouds, skylights, and antenna bases.
- Ladder edge check: You can inspect roof edges and upper sidewall transitions from a stable ladder without stepping onto the roof.
- Interior moisture check: Inspect ceiling corners, around vents, inside overhead cabinets, and near the front cap after storms.
- Storm follow-up: After hail, wind, or heavy wet snow, do a same-day visual check from the ground.
For homeowners who already use seasonal exterior checklists, some of the habits in this Seattle homeowner roof care checklist carry over well. The principle is the same. Small problems are easier to catch during routine checks than after interior damage appears.
When to stop and call a pro
Don't DIY every issue.
Call for professional help if you find:
- Widespread soft decking: That often means moisture got below the surface.
- Recurring leaks: Repeated patching usually means the leak path was misidentified.
- Cracked sealant around multiple roof penetrations: A broad reseal is safer than piecemeal guessing.
- Any inspection that requires roof access you can't do safely: No trip is worth a fall.
A Step-by-Step Guide to Cleaning and Sealing
A lot of roof leaks start after a simple cleaning job that went wrong. The owner used a harsh cleaner, tracked grit across the membrane, or sealed over a damp seam. In Utah, I also see damage from another pattern. Owners wait until a hot July afternoon or right after a winter storm, then try to rush the work. Both conditions make roof care harder and less safe.
Cleaning has two jobs. It clears off debris that traps moisture against the roof surface, and it gives you a clean view of the seams, vents, skylights, and sealant lines that keep water out.
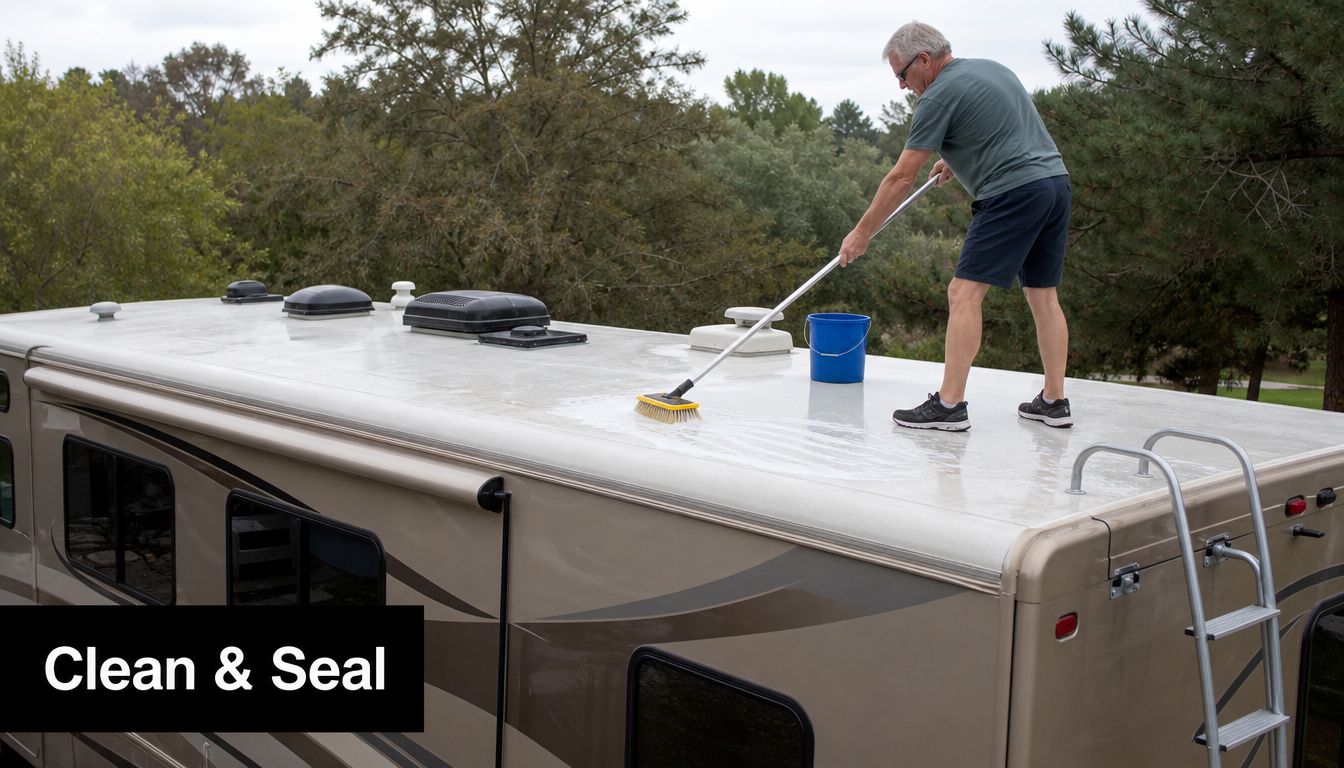
Start with safety and the right setup
Pick the right day first. A calm, dry morning is best, especially along the Wasatch Front where afternoon wind can pick up fast. Avoid cleaning after an overnight freeze, after snowmelt, or during peak summer heat when high-altitude UV has already softened some sealants and made the roof surface harder to work on comfortably.
Wear shoes with dependable grip. Set your ladder on level ground. Have another adult nearby. If the roof feels slick, dusty, frosty, or unstable underfoot, stop there and handle it from the ladder edge or schedule service.
That matters even more for owners who dislike heights. You do not need to force a full roof walk just because an online checklist says so. A shop can handle the cleaning and reseal safely, and in many cases that is the better call than risking a fall over routine maintenance.
Keep the tool list simple and roof-safe:
- Soft-bristle brush
- Bucket with diluted mild detergent if your roof material allows it
- Clean rags or microfiber towels
- Garden hose with low-pressure rinse
- Compatible sealant for your roof and penetration type
- Caulk gun and gloves
Cleaning rubber roofs without shortening their life
The wrong cleaner can do more damage than the dirt.
EPDM and other RV roofing materials do best with non-abrasive, roof-safe cleaners. Harsh solvents, petroleum-based products, and stiff brushes can dry the surface, weaken the membrane, or shorten the life of the sealant around penetrations. KOA's RV roof care article also advises using roof-safe cleaners and inspecting the roof regularly instead of relying on occasional heavy scrubbing.
Skip household degreasers, abrasive pads, and any product you have not checked against your roof material. “Natural” on the label does not mean safe for rubber roofing.
A cleaning routine that works in the real world
Use a method that keeps dirt from becoming damage:
- Remove dry debris first. Lift off branches, pine needles, seed pods, and leaf litter by hand or with a very soft broom.
- Rinse lightly. Low pressure is enough. High pressure can push water into weak seams or under loose edge areas.
- Wash in small sections. A manageable work area helps you see what you are doing and keeps soap from drying on the roof.
- Give extra attention to penetrations. Dirt collects around vents, skylights, ladder mounts, antennas, and AC units.
- Rinse thoroughly. Soap residue holds grime and can interfere with sealant bonding later.
- Let the roof dry fully. A clean but damp roof is not ready for sealant.
On Utah coaches, I tell owners to pay close attention to chalking and brittle-looking sealant after long sun exposure. High-altitude UV is hard on horizontal surfaces, and roof sealant usually shows age before sidewall sealants do.
A clean roof should also be a quiet inspection. Every pass with the brush is a chance to spot lifted edges, pinholes, hairline cracks, or old sealant that has started to pull away from the flange.
Here's a helpful visual if you want to see product handling and application basics in action.
Sealing the right way
Sealing is a repair step, not a cosmetic one. The goal is to restore the waterproof barrier at roof penetrations and seams before water gets into the decking.
For routine maintenance, the usual focus is lap sealant around vents, skylights, plumbing stacks, antennas, and AC openings. If the old sealant is dirty, loose, badly cracked, or no longer bonded, new sealant on top will not hold for long.
Use this approach:
- Inspect the sealant line closely before applying anything
- Clean the area the product manufacturer says can be cleaned
- Remove failed material only where that is appropriate for your roof and sealant type
- Apply self-leveling lap sealant on horizontal roof penetrations where the product is designed to flow and settle
- Give it full cure time before rain, washing, or travel
If you want product-specific guidance before opening the tube, this guide to Dicor self-leveling sealant application and use covers the basics clearly.
Mistakes that create repeat leaks
The failures I see most often are preventable:
- Smearing new caulk over dirt or loose sealant
- Using household roofing products that are not made for RV materials
- Sealing over a damp surface
- Fixing one visible crack while ignoring the sealant around the same fixture
- Working too soon after snow, rain, or morning condensation
- Rushing roof work even though you are uneasy on a ladder or uncomfortable with heights
Good roof maintenance is steady, material-specific work. If you are unsure about the roof material, the correct sealant, or your footing, let a shop handle the cleaning and reseal. That is often the safest maintenance decision an owner can make.
Handling Common Roof Repairs and Patching
You pull into a campsite after running I-15, look up, and spot a small gouge from a low branch you clipped backing into storage. That kind of damage can stay minor if you address it while it is still on the surface. Leave it through a Utah storm cycle, and the repair can turn from a patch job into wet insulation, stained ceiling panels, and soft roof decking.
Three repairs owners see most often
These are the problems we handle most often in the shop, especially after summer tree contact and winter snow movement:
| Problem | Typical cause | Best first response |
|---|---|---|
| Small puncture | Branch strike or impact | Dry the area and patch it promptly |
| Cracked lap sealant | UV exposure, age, roof flex | Remove failed sections as needed and reseal with a compatible product |
| Small membrane tear | Snag, abrasion, aging material | Patch it with a roof-compatible repair method before it spreads |
At our Salt Lake City shop, high-altitude sun is one of the biggest reasons small cracks become larger repairs. UV hardens sealants faster here than many new owners expect, so a minor defect in spring can look much worse by late summer.
Match the repair to the failure
A lot of bad roof repairs start with the wrong material, not bad intentions. Lap sealant is for joints and penetrations. Patch material is for damage in the roof field. Those are different jobs.
Use this rule set:
- Use lap sealant around vents, plumbing stacks, antennas, ladder mounts, and other roof penetrations where the original joint has opened up.
- Use a patch or repair tape approved for your roof material on a puncture or short tear in the membrane itself.
- Use a shop repair if the decking feels soft underfoot, the membrane is loose over a broad area, or water has already gotten below the top layer.
If you are trying to sort out whether the problem is still manageable or has crossed into structural repair, this guide to RV roof leak repair costs and repair scope will help you judge it.
Small surface damage is usually maintenance. Soft decking, recurring leaks, and interior staining point to a larger repair.
A repair process that actually holds
For cracked sealant around a vent or skylight, prep matters more than speed. Failed material, chalky residue, and trapped moisture are what make fresh sealant let go early.
A sound reseal usually looks like this:
- Confirm the roof material and sealant type first
- Work only on a dry surface
- Remove loose, lifted, or failed sealant where the product calls for removal
- Clean the repair area with methods approved for that roof and sealant
- Apply the correct self-leveling or non-sag sealant for that location
- Give it full cure time before travel, rain, or washing
That last step gets ignored all the time. Owners patch a roof in the morning, then drive home at freeway speed by afternoon. Wind, dust, and movement can compromise a repair before it has set.
When tape is the smarter choice
Tape can be the better answer for a small puncture or short membrane tear, especially if the damage is in the open field of the roof and not at a vent flange. It gives immediate coverage and can buy time until a full inspection, but only if the surface is clean, dry, and stable.
Tape is not a cure-all. It should not be used to hide wet substrate, bridge over crumbling sealant, or cover widespread cracking across several fixtures. If the roof has multiple failure points, patching one spot usually does not stop the next leak.
Repairs that should not wait
Move these to the top of the list:
- Fresh punctures after tree contact
- Sealant gaps around vents, skylights, and front or rear roof transitions
- Skylight cracks
- Damage found after hail, ice, or heavy snow shifting on a parked coach
If you are uneasy on a ladder or you know heights make you rush, that matters. Roof work goes bad fast when an owner is trying to finish quickly just to get back on the ground. In that case, the safer move is to have a shop handle the patching and inspection. We see that choice save owners money every season, especially after winter in Utah when snow load and freeze-thaw movement can open up more than one area at a time.
Your Year-Round Utah RV Roof Maintenance Schedule
A lot of roof leaks in Utah start the same way. The coach comes out of storage looking fine, the first trip gets booked, and the owner finds a ceiling stain after a spring rain or a hard afternoon melt. By then, the roof problem usually started weeks earlier.
A calendar works better than random checkups here because Utah is hard on RV roofs in different ways each season. High-altitude UV dries exposed sealants faster than many owners expect. Winter snow can sit heavy on a parked coach. Dust from summer travel can hide small cracks until water finds them.
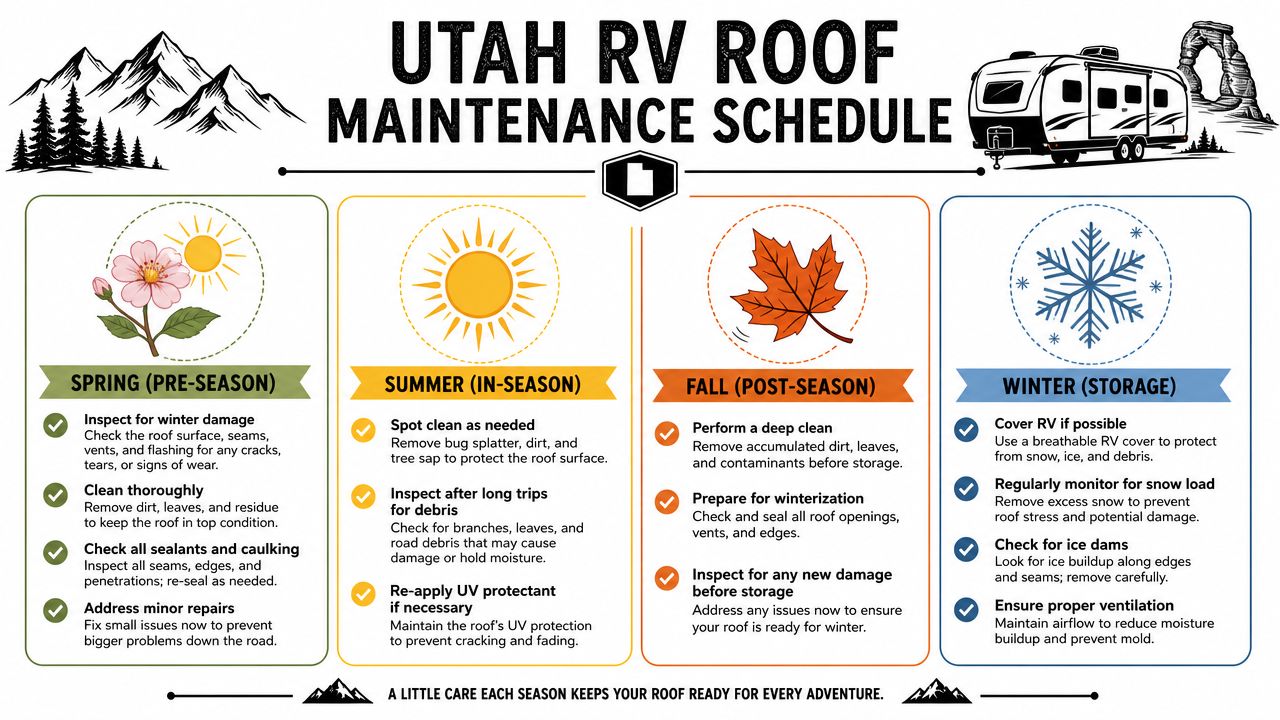
Spring in Utah
Spring is the most important inspection window of the year. In our Salt Lake City shop, this is when we find damage from snow load, freeze-thaw movement, and branches that sat unnoticed all winter.
Put these jobs on the spring list:
- Inspect all roof openings and edge seams: Pay close attention to vents, skylights, antenna mounts, and front and rear transitions.
- Wash the roof well enough to expose defects: Dirt and pollen can hide small splits and lifted sealant.
- Check inside before your first trip: Look at upper cabinets, ceiling trim, and front cap corners for staining or softness.
- Schedule repairs early: Spring service books up fast across northern Utah once camping season starts.
If heights make you uneasy, build around that now instead of forcing a roof climb later. A ground check with binoculars, a ladder-edge inspection, and an interior moisture check will catch plenty. Then hand off the roof-level inspection to a service shop.
Summer on the road
Summer wear in Utah is less about snow and more about sun, heat, dust, and campground tree contact. A coach that runs through southern Utah, then parks under pines in the mountains, sees two different kinds of roof stress in one week.
Keep summer checks short and frequent:
- After long drives: Look for low-branch scrapes, loose vent lids, and shifted accessories.
- After dusty travel: Rinse enough to expose fresh cracks or punctures.
- After hail or wind: Check for impact marks, opened seams, and missing covers.
- Before the next trip: Confirm previous patch material and sealant still look bonded.
Fall before storage
Fall maintenance decides how the roof will handle winter. A seam that looks minor in October can turn into interior damage by February once snow sits on it and daytime melt works into the opening.
A solid fall routine looks like this:
| Fall task | Why it matters in Utah |
|---|---|
| Deep clean | Removes sap, leaves, and dirt that hold moisture during storage |
| Sealant review | Catches dried, shrinking, or separated sealant before snow season |
| Interior inspection | Finds small leaks while the coach is still easy to dry out and repair |
| Storage setup check | Helps reduce debris buildup and standing water in problem areas |
If you plan to refresh aging seams before storage, this guide to RV exterior sealant and where it fits in roof upkeep is a useful reference.
Winter while parked
Winter roof care is mostly about monitoring conditions and knowing when to stop climbing. I tell owners this every year. A slippery ladder and a snow-covered roof are a bad combination, especially if you already dislike heights.
Focus on practical winter checks:
- Watch snow accumulation: Wet, dense snow is harder on a roof than light powder.
- Check after major storms from the ground first: Look for sag concerns, damaged covers, or anything out of place along the roofline.
- Pay attention to interior humidity: Condensation on cold surfaces can mimic a leak and send you chasing the wrong problem.
- Use professional help when footing is poor: Winter is a good time to let a shop handle inspection work safely.
For many Utah owners, the best yearly plan is a hybrid one. Handle the safe ground-level and interior checks yourself, then book a professional roof inspection in spring and again before winter storage. That approach keeps you off a roof you do not trust and still gives the coach the attention it needs.
Keep Your Adventures Covered with Motor Sportsland
Motorhome roof maintenance comes down to a few habits that work. Know your roof material. Inspect it on a real schedule, not just when something looks wrong. Clean it with products that won't damage it. Repair minor defects quickly, and don't confuse a neat-looking bead of sealant with a waterproof repair.
Utah makes consistency even more important. High-altitude UV, dusty travel, sudden weather swings, and winter snow all put pressure on seams and roof openings. Owners who stay ahead of those stress points usually avoid the expensive surprises that show up in ceilings, cabinets, and wall structure later on.
If heights make you uneasy, build your plan around that instead of pretending it isn't a factor. Ground inspections, ladder-edge checks, interior moisture checks, and professional roof service are all valid ways to protect your coach. Safe maintenance is good maintenance.
When a roof needs more than a cleaning and touch-up, getting experienced help early usually saves frustration. The worst roof jobs are the ones that started small and got ignored because the damage didn't seem urgent.
If you'd rather have an experienced local team handle the inspection, sealing, or repair work, Motor Sportsland is a solid place to start. You can browse RVs on their site, explore service options, or stop by their Salt Lake City area showroom to talk through roof condition, storage concerns, and maintenance needs before your next Utah trip.
FAQ
How often should I inspect my motorhome roof in Utah
In Utah, plan on a full roof check at least once per season, then add an extra inspection after hail, heavy wind, or a storm that leaves snow sitting on the coach. Our high-altitude sun dries sealants faster than many new owners expect, and winter weight can expose weak spots around roof openings.
What's the best cleaner for a rubber RV roof
Use a cleaner labeled safe for EPDM or TPO rubber roofing. Avoid petroleum solvents, abrasive pads, and household cleaners that can dry the membrane, strip protective finishes, or leave residue that causes trouble when it is time to reseal.
How long does a motorhome roof last
Roof life depends on the material, storage conditions, and how quickly small sealant failures get addressed. A well-kept fiberglass or aluminum roof usually stays serviceable longer than a neglected rubber roof, but I have also seen newer roofs fail early because owners skipped inspections and let minor cracks turn into leaks.
Can I maintain my RV roof if I'm afraid of heights
Yes. That concern is common, and it is better to work around it than force a risky climb.
A solid plan is to do ground-level checks with binoculars, inspect the roof edge from a ladder with someone spotting you, and watch the interior for stains, soft spots, or musty smells. If getting on the roof feels unsafe, schedule a professional inspection and cleaning. That is often the right call for owners with mobility limits, balance concerns, or no safe place to work at home.
What areas of the roof leak most often
The usual problem spots are vents, skylights, plumbing stacks, ladder mounts, front and rear seams, and the perimeter where accessories meet the roof. On Utah coaches, I pay especially close attention to AC units and sealant around roof penetrations because UV exposure, freeze-thaw cycles, and road vibration work those areas hard.
What should I use to reseal cracked lap sealant
Use the sealant recommended for your roof type and the fixture you are sealing. In many cases that means a self-leveling lap sealant on horizontal roof surfaces, but product choice still depends on the membrane and the repair area.
Do not smear new sealant over dirty, loose, or failing material and assume it is fixed. Clean the area the right way, remove what needs to come off, and apply a compatible product to a dry surface. If the sealant is pulling away, the membrane feels soft, or water may already be under the roof skin, it is time for shop service instead of a quick patch.
